If you have a Single Sign-On (SSO) provider which is not Microsoft Entra ID or Google SSO, if your SSO provider supports SAML then you should be able to set up SSO via SAML to provide authentication for your users signing into Genius.
What do I need to do in my Identity Provider (e.g. Okta, AWS IAM, etc…) to set up SSO via SAML
In your Identity Provider most likely you'll need to go through the process of setting up a new application or integration. This process will vary based on who your identity provider is, but usually will follow these steps:
- Give your application integration a name (call it something like AVOXI Genius)
- Give the identity provider information on how Genius integrates via SAML such as:
- Single sign-on URL (sometimes called Application ACS URL)
- Audience URI (SP Entity ID)
- Name ID format
- This should be your email address
- Should the assertion or the response be signed?
- Genius expects both the assertion and response to be signed.
- At this point, you should be able to copy the Metadata URL and paste into the Genius SSO setup (see below) or alternatively get the Login URL and SAML Signing Certificate to set up.
Subject Format in your Identity Provider
Some Identity Providers (e.g. Amazon Federated) may not default to the email being used as the default Subject. If you set everything up but receive an error from Genius after logging into your SSO provider, you may want to check the format of the Subject.
Usually this can be found in an Attribute or Subject Mapping section. You'll want to make sure the subject looks like this:
urn:oasis:names:tc:SAML:1.1:nameid-format:emailAddress
This means you may need to change the subject or format of the user attributes to have either email or ${user:email} to make sure Genius gets the correct information in the correct format.;
What do I need to do in Genius to setup SSO via SAML?
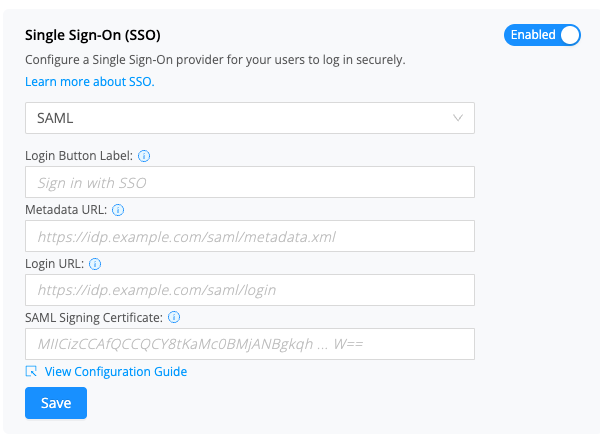
In order to set this up, an Administrator must navigate to Home → Settings → Security Controls. From here you will see the Login Settings section. In this section, update the dropdown for Single Sign-On (SSO) to SAML and fill in the appropriate details before clicking Save.

To get started with our generic SAML interface, we will need the Metadata URL OR a Login URL & SAML Signing Certificate.
-
Preferred Setup Method
- Metadata URL
- This is your identity provider's metadata URL
- E.g. For Okta, you can get this by having an Admin sign in to the Okta Admin app and generate the IDP metadata variable
- Metadata URL
-
Alternative Setup Method
- Login URL
- This is your identity provider's login URL.
- E.g. this is the location where the browser would be re-directed to sign in for your users. For Okta, this might be [yourorganization].okta.com. You can sign in to the Okta Admin Dashboard to generate this URL.
- This is your identity provider's login URL.
- SAML Signing Certificate
- This is the PEM Text format x509 Certificate from your identity provider.
- IMPORTANT: Please remove the BEGIN CERTIFICATE and END CERTIFICATE lines and provide your certificate as as a single line in this text box.
- E.g. For Okta, you can sign in to the Okta Admin Dashboard to generate the x509 Certificate in PEM Text Format.
- This is the PEM Text format x509 Certificate from your identity provider.
- Login URL
You can also update the Login Button Label - this is the text that will show on the Sign in with SSO button. Maximum 30 characters. If no text is provided, then the button will display “Sign in with SSO”
Note: See section on Account Login below for how to set up automatic forwarding to SSO so your users will not need to click a Sign in with SSO button
Once set up to sign in via SAML, your users will be able to sign in to Genius with their credentials from their company account. Please make sure the email for their user in Genius matches the email on their company account or the user may encounter errors when logging in.
Warning: Document Signing
Genius expects both the document and assertion to be signed, which should be a setting you can configure in our identity provider. Not signing both the document and assertaion may lead to an error when setting up and testing out SSO via SAML.
Account Login
If you want your users to be automatically forwarded to login with SSO (so they do not need to click a “Login with SSO button” you'll need to turn off Account Login.
Account Login is the ability to use your old AVOXI Genius credentials to login with the password managed through AVOXI. Once SSO is enabled, ideally you should turn off Account Login as that will automatically forward your users to sign in with your SSO provider when they attempt to login.
You may want to leave Account Login enabled if you have additional accounts which are not directly tied to a user that you use. These might be things like Administrative accounts or Integration accounts which are not representative of a specific person.