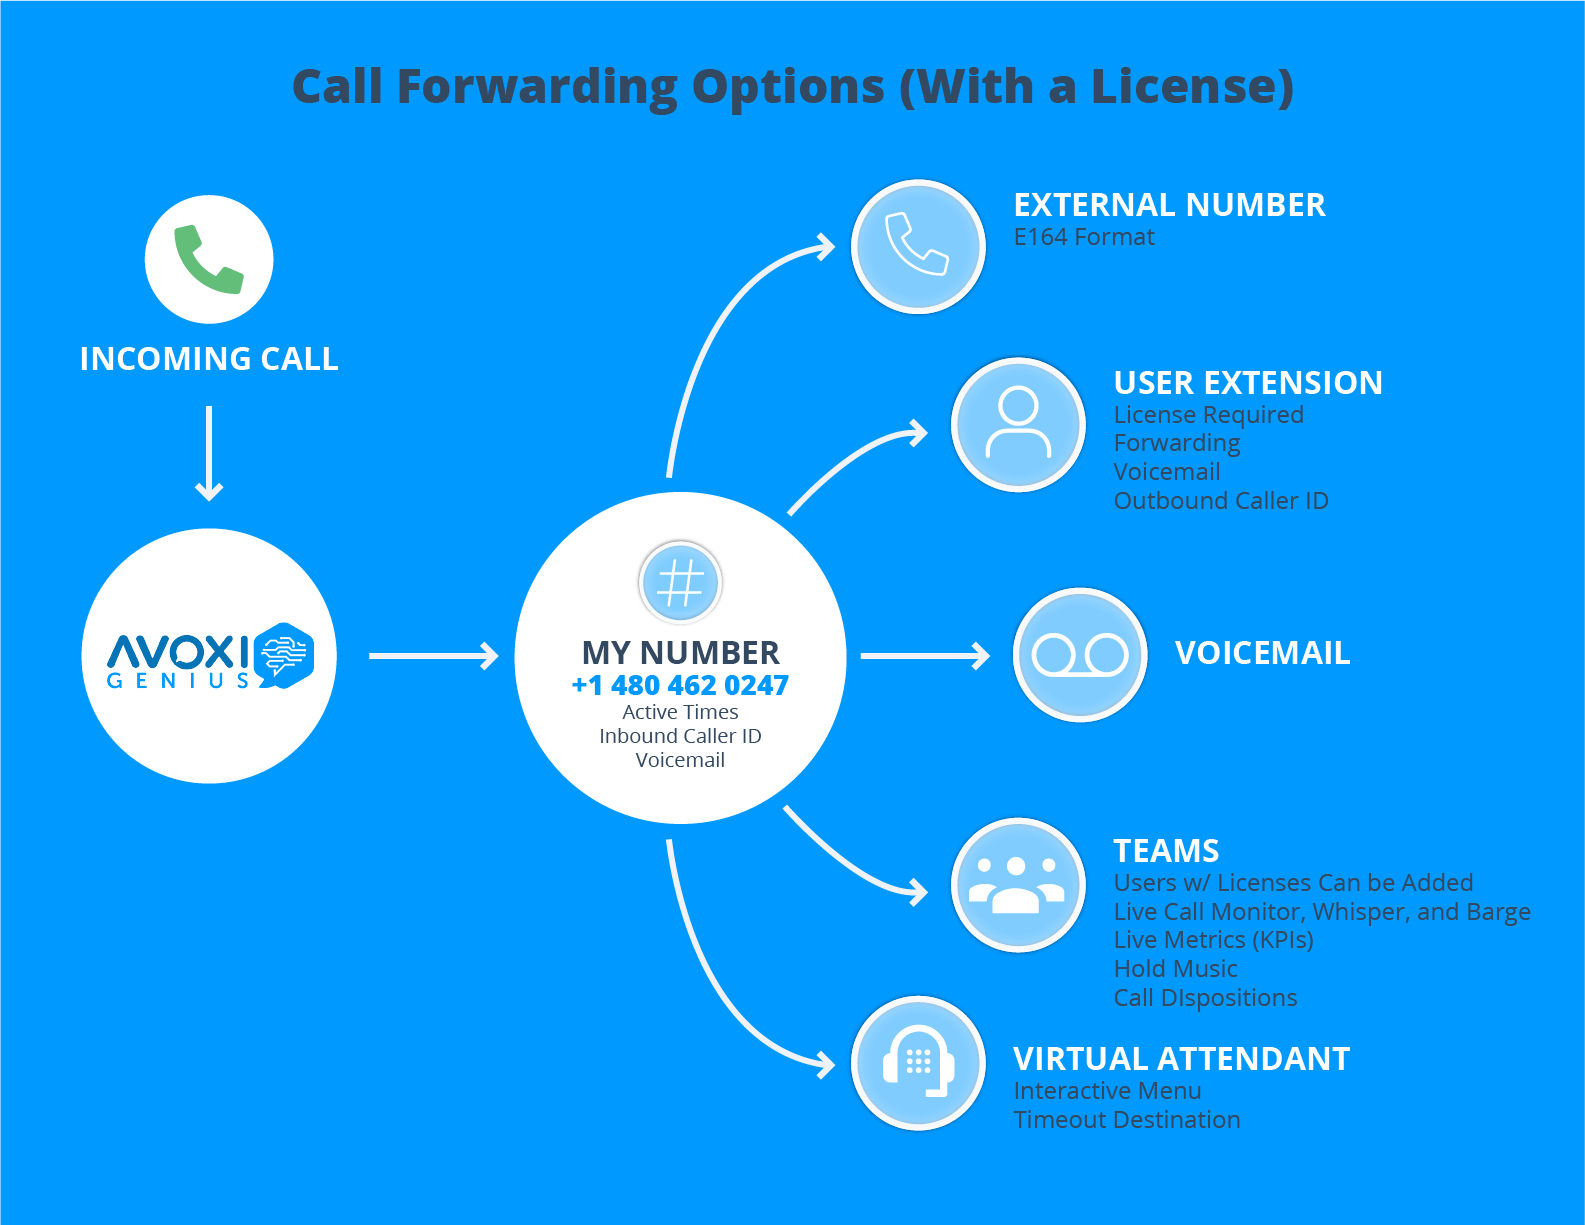
Call forwarding gives users/agents the ability to automatically forward incoming calls on a phone number and extension to an alternative number, device, extension, or voicemail.
Below are outlined the different scenarios for call forwarding and highlight which functionalities require a Genius License.
Setup Call Forwarding on a User Extension
The call forwarding feature gives users/agents the ability to automatically forward incoming calls on their extension to an external number, user extension, or voicemail.
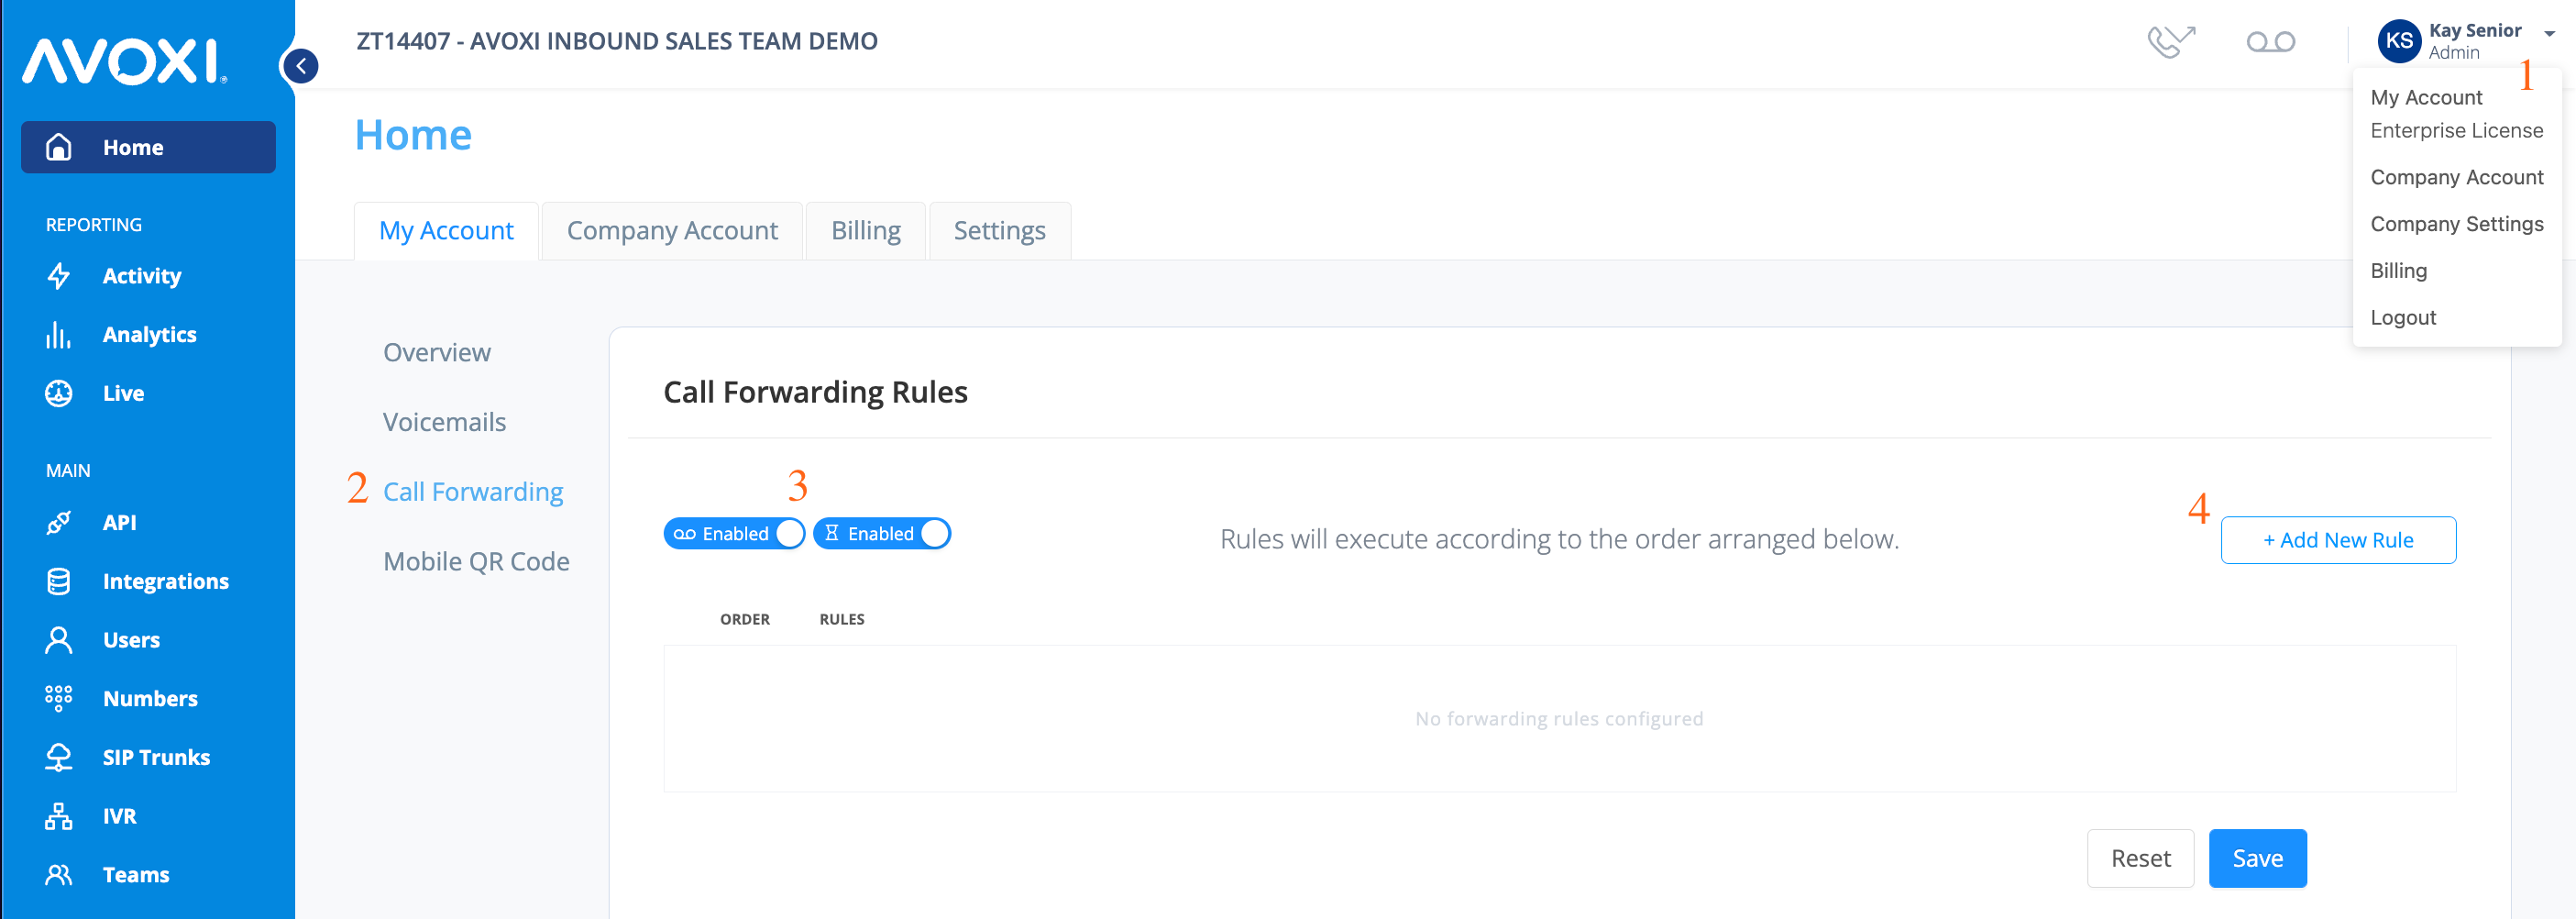
- To configure the call routing for a user/extension, begin by logging in to your AVOXI Account.
- Once you’ve successfully logged in, select the “Home” section on the left-hand navigation bar.
- On the “My Account” tab, select “Call Forwarding.”
- Select the “Call Forwarding” tab to configure your settings.
- Enable Voicemail: If enabled, allows calls to route to voicemail if the user does not answer.
-
Enable Call Forwarding: When disabled, the user will only receive direct calls when their status is ‘Available.’ Calls will be automatically declined if the user is on another call or paused.

- Next, select the “+Add New Rule” button.
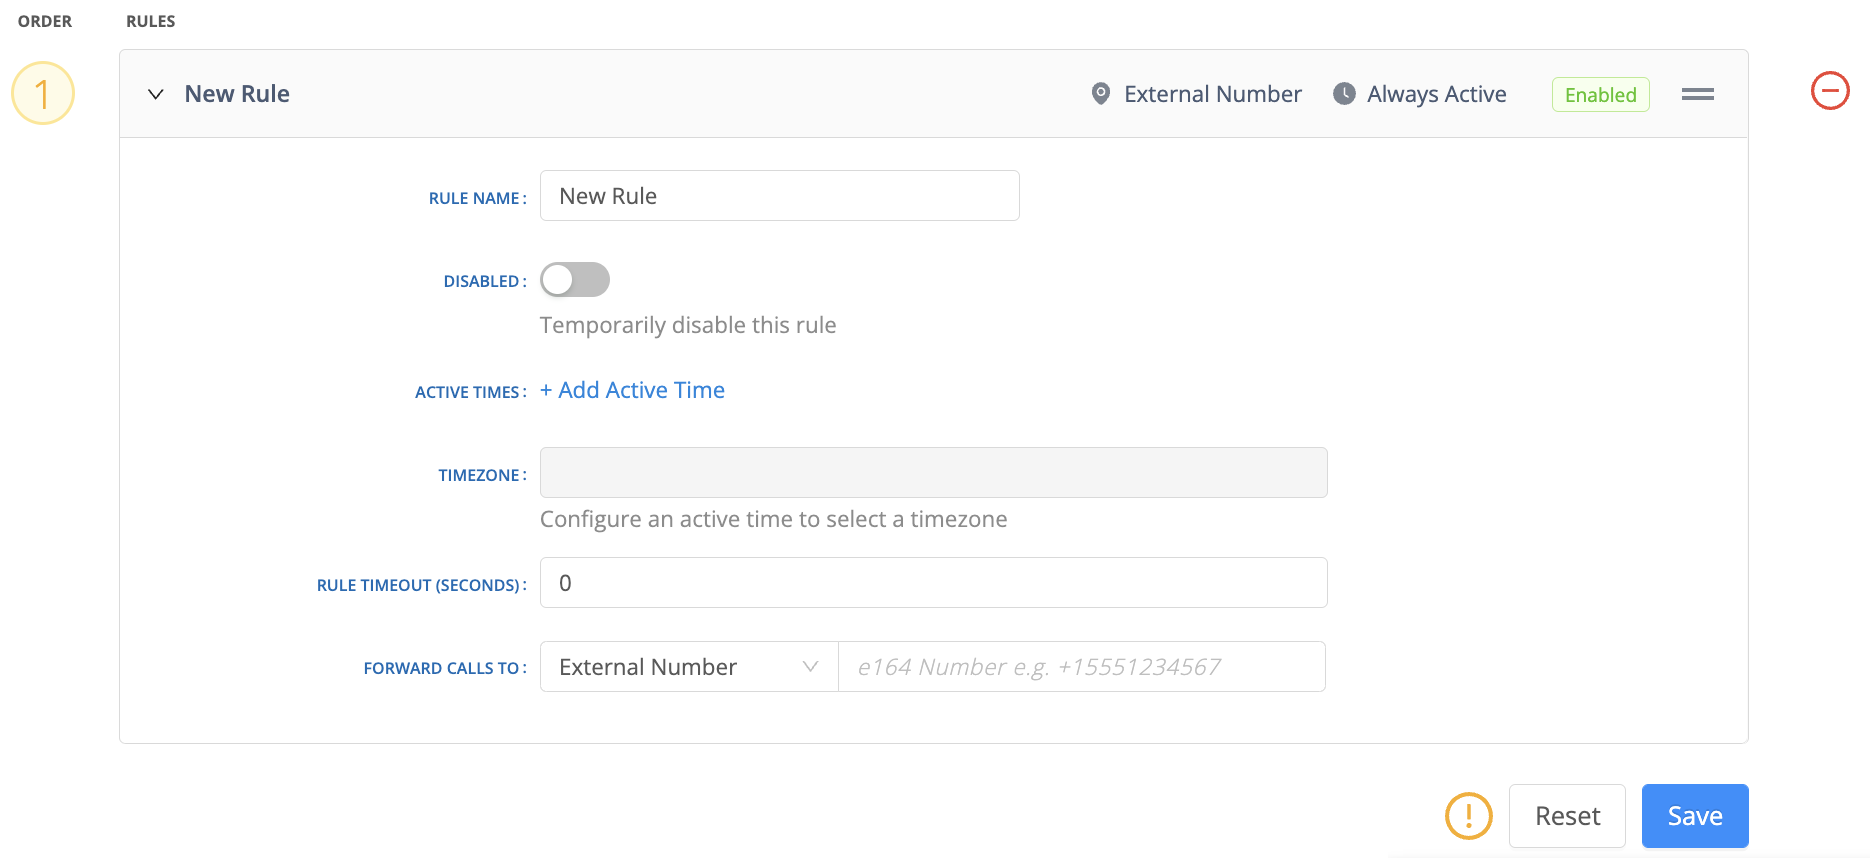
- Configure your call forwarding rule by filling in the below information:

-
Rule Name
- Give a unique name to your forwarding rule.
-
Disabled
- Toggle ON to temporarily disable this forwarding rule or toggle OFF to keep the rule active.
-
Active Times
- As an advanced feature, you have the option to set specific active times for when the rule should apply.
- Select the start date for when the rule should begin and end.
- To apply the rule indefinitely, set the end date to never. “Active Days” and “Time” allows you to select specific days and times when the rule should be active.
- Tips & Tricks: The advanced feature allows you to route calls with rules that have overlapping active times. If the first action doesn’t answer, the call will be routed to the second.
-
Caller ID
- Next, decide how you’d like incoming calls to display on your phone’s screen. For example, “Show Dialed Number” will display the number that the call is being forwarded from.
- “Show Caller’s Number” will display the incoming caller’s number.
-
Rule Timeout (Seconds)
- Set how many seconds the call should ring before the following rule is applied or the call is diverted to an alternate destination such as a voicemail (as a rule of thumb, 5 seconds is one ring.
- We recommend at least 30 seconds for optimal configuration).
- Tips & Tricks: This is the time in seconds the rule will apply before the call is disconnected or goes to voicemail. As a reference, 5 seconds = 1 ring. Zero (0) will set the rule to never timeout. This timeout will NOT be considered when forwarding to a Call Queue or a Virtual attendant.
-
Forward Calls To (Routing calls)
- Select from External Number, User Extension, Voicemail, or SIP,
- and then specify the exact location.

-
External Number
- When forwarding calls to an “External Number,” make sure to add + then the country code, area code if necessary, and then the number. Example: +16785818358

- When forwarding calls to an “External Number,” make sure to add + then the country code, area code if necessary, and then the number. Example: +16785818358
-
User Extension
- When forwarding calls to a “User Extension,” select the forwarding extension from the dropdown.
-
Voicemail
- To set the number directly to “Voicemail,” set the timeout to 1 second.
- On completion, select the Save button.
Important Tips
- Rules can be arranged in the order of preferred execution.
- You can add several rules with different active times to cover multiple time zones.
- Be careful of time conflicts; if two rules have conflicting active times, you may encounter an error that will prevent your call from reaching its final destination. To avoid conflicts of forwarding, make sure none of your active times overlap.
- Before selecting extensions, call groups, call queues, or virtual attendants, ensure these are set up.
- Voicemail cannot be enabled in a call forwarding rule until the voicemail feature has been configured.
- AVOXI does not offer simultaneous forwarding. However, rules can be set with overlapping active times. If the first action doesn’t answer, the call will be routed to the second.
- You can edit your rule anytime by clicking on the pencil icon.
- You can also disable and enable rules anytime using the toggle beneath the rule name.
-
To delete the rule entirely, click on the minus icon.

