Dispositions, also known as tags, provide contact center agents with structured/categorized options for qualifying what happened on inbound and outbound calls. By tracking call outcomes, and notes, managers gain valuable insight into the success of their Team's process and customers’ needs.
As an AVOXI Admin, you can configure dispositions at a team level and request agents to submit a disposition immediately after each call. These will be loaded into a drop-down menu in the web phone for agents to choose from, with the Option to select multiple selections. Using the “required” setting, you have the flexibility to make it mandatory for agents to complete a disposition before moving on to the next call. In addition, Agents can submit dispositions on all direct calls, both inbound and outbound and take notes.
Inbound and Outbound Calls
Admins can configure dispositions on inbound and outbound calls at an org level via the Accounts and Preferences section of their AVOXI online account.
- To get started, log into your AVOXI User Interface.
- Click your account avatar in the top right-hand corner.
- Select Company Account.
- Select the General section located on the left
- Then click the settings tab
- Use the 3 dots next to the required call direction, i.e., Inbound or Outbound.
There can be only one org-level inbound disposition, and one org-level outbound disposition set simultaneously. (Please note this limit does not apply to team dispositions).
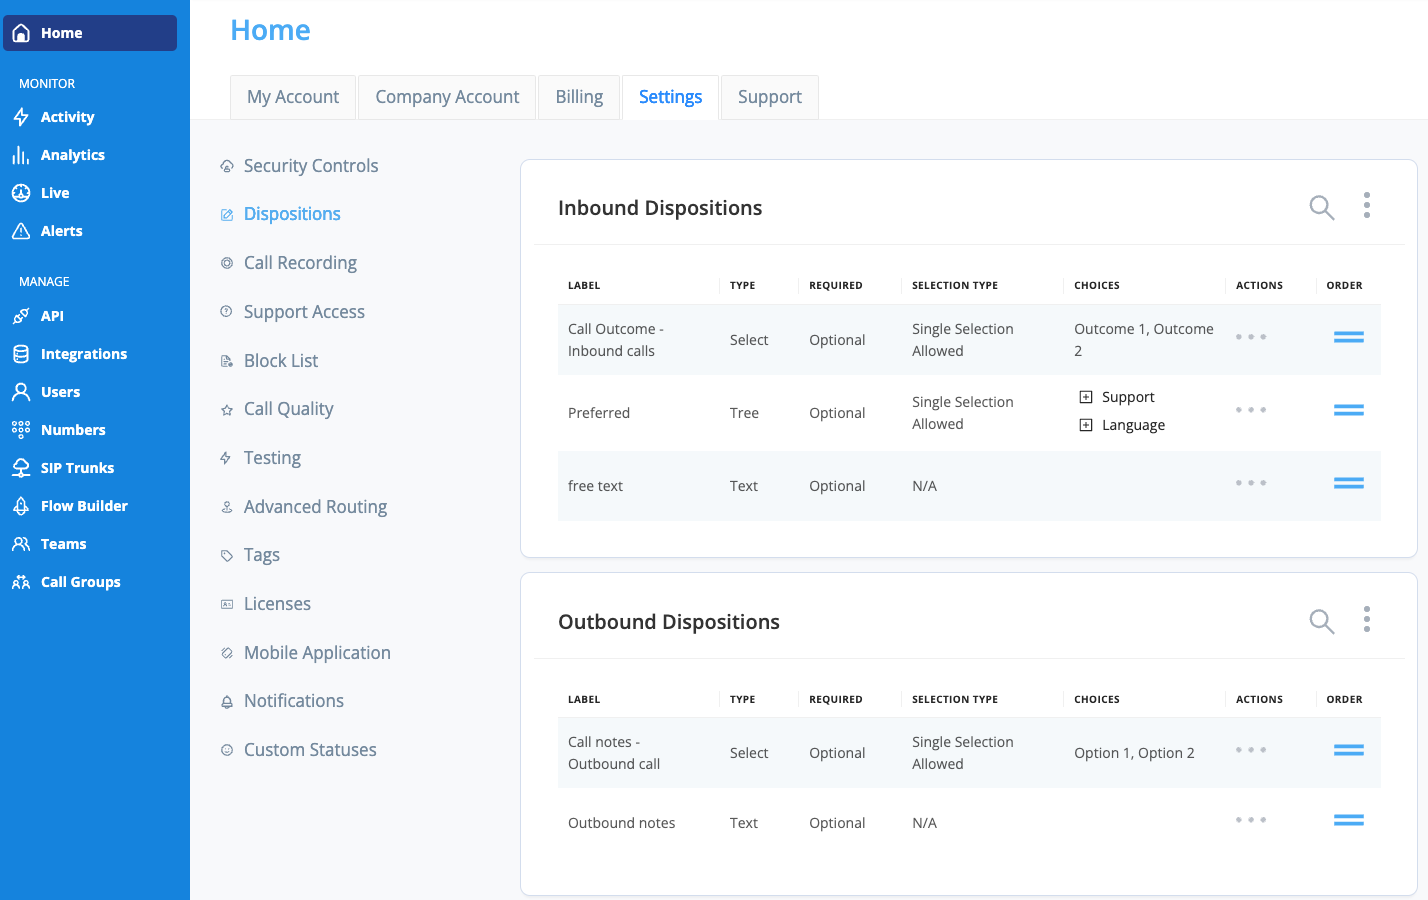
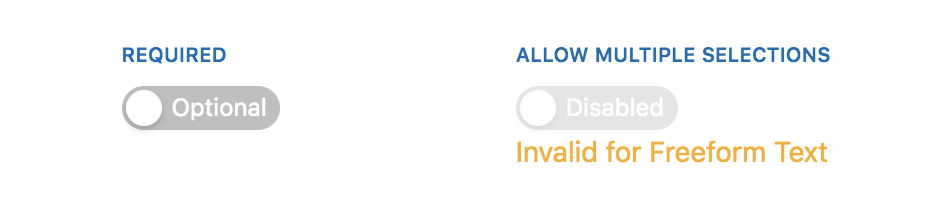
- Using the drop-down Configuration of org-level dispositions is the same as team dispositions, except that there is no 'Tree Select' option. Instead, 'Freeform' and 'Simple Select' are available.
Outbound disposition example: For a generic outbound disposition, a simple selection for the result of an outbound call would be appropriate.

-
Inbound/Outbound Disposition Example: Freeform general notes to be taken during or after a call.

- Inbound Disposition Example: A simple selection of the type of transfer or direct inbound call received for generic direct inbound dispositions.

- Dispositions and notes can now be completed during a call by selecting the disposition button on the webphone when on a call.

Queue Disposition: If a non-queue call comes in while completing a "Queue" disposition, the agent will see the incoming call and won't lose the queue disposition.
Creating Team Dispositions
Use the below step-by-step guide to create mandatory dispositions specific to a team.
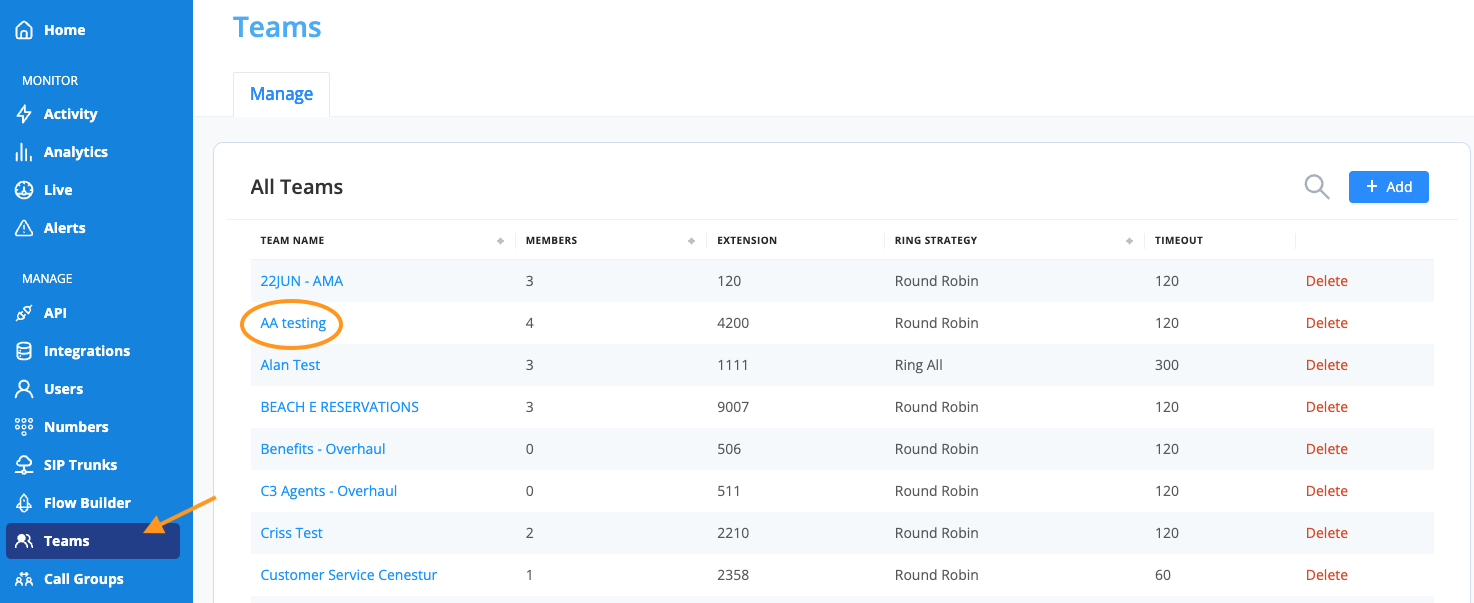
- Select the "Teams" icon located on the left-hand side navigation bar.
- Select the Team for which you wish to create call dispositions.
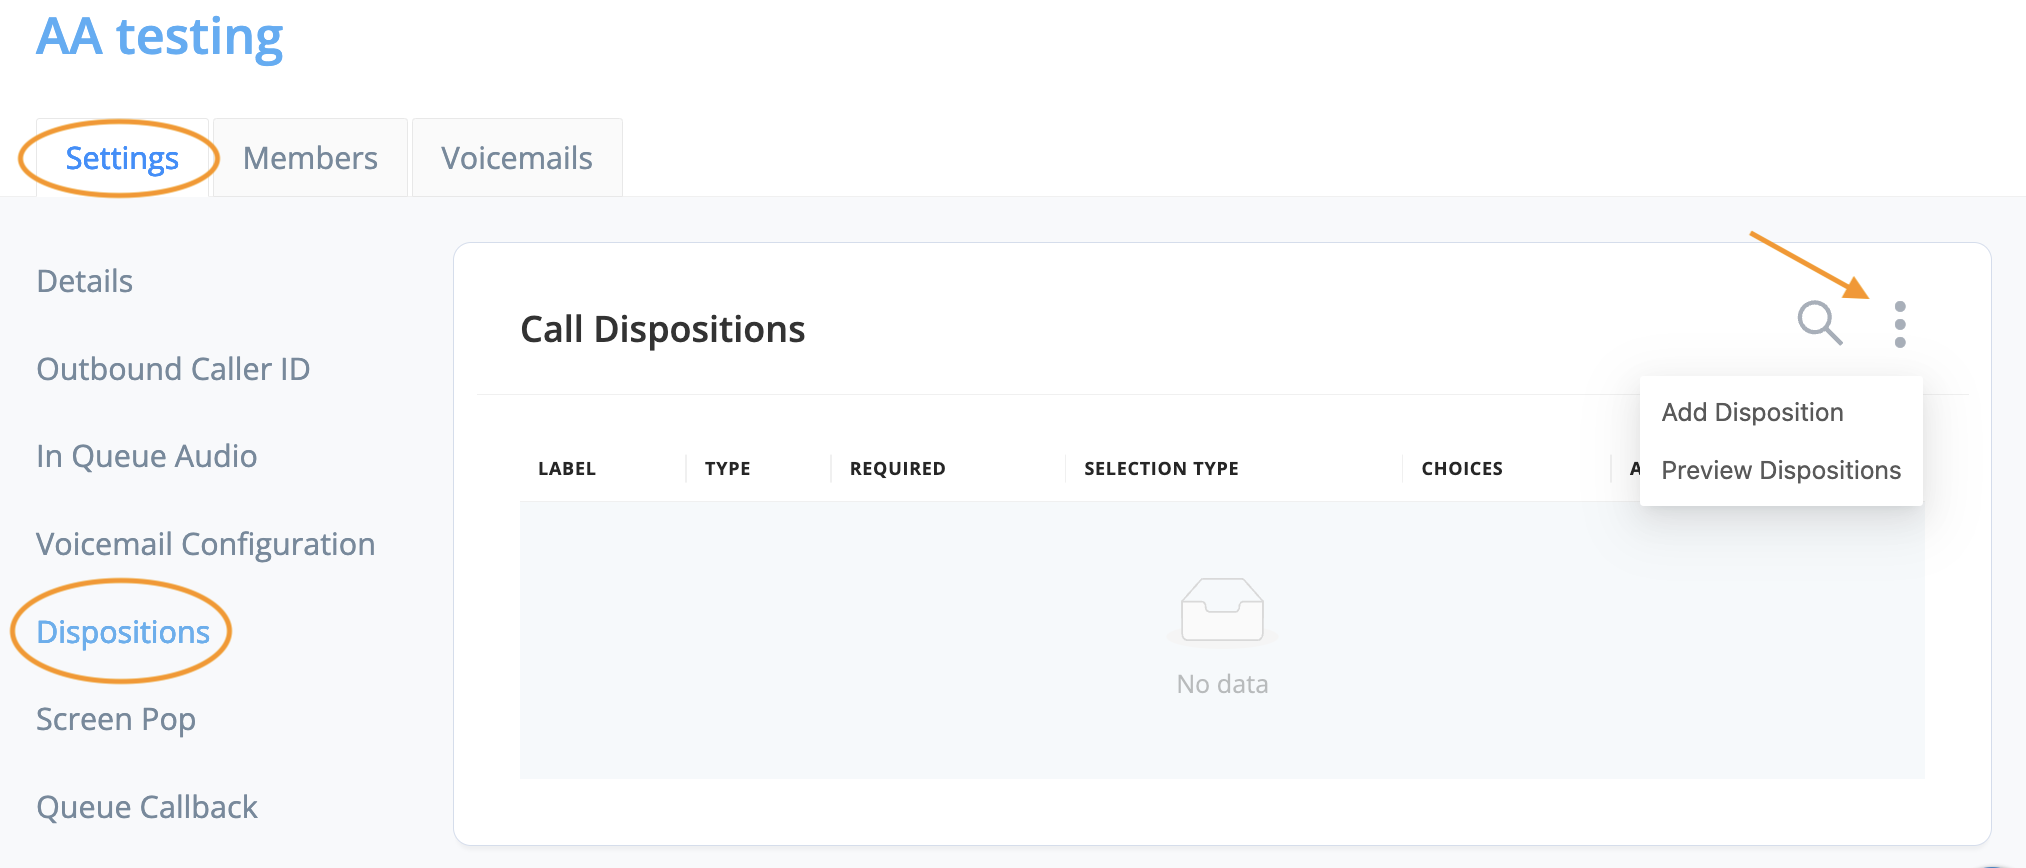
- Click the Settings tab located at the top, and then select Dispositions.
- Next, select the three dots icon on the left-hand side and click "Add Disposition."
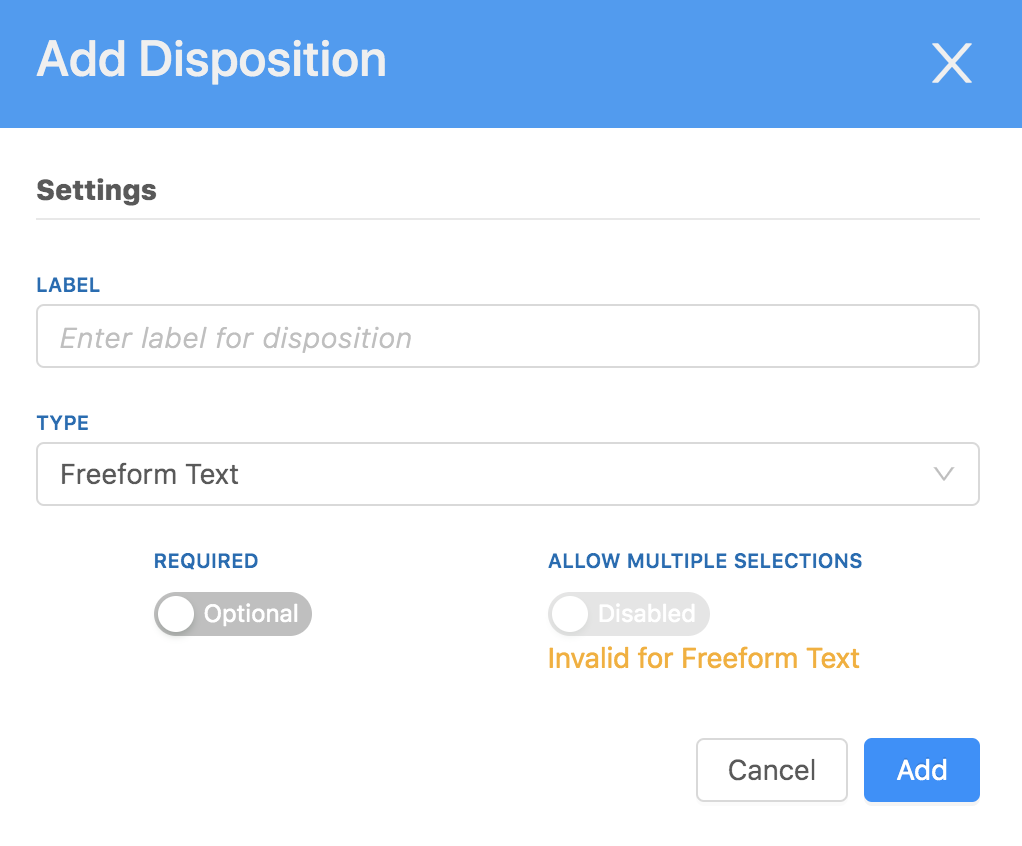
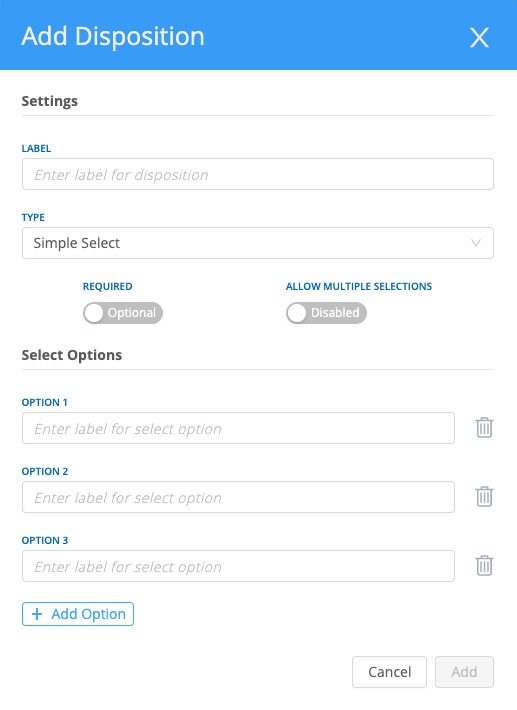
- Give your disposition a label; some popular examples include:
- Case Resolved
- Product Sold
- Appointment Booked
- Scheduled Demo
- Not Interested
- Next, select your rep type.
-
AVOXI Tip: As an admin, you can create as many dispositions as you wish. These will be loaded into a drop-down menu for agents to choose from.
-
Type - Freeform Text
- This allows your Agents to type in whatever they’d like when closing out the call.
- Decide if you want to make this required or optional.
- Then select Add.
-
Type - Simple Select
- This allows your Agents to choose a disposition from preset options.
- Select + Add Option and label each of your options.
- You can set up as many as you’d like by selecting the +Add Option.
- Decide if you want to make this required or optional and if you want to allow for multiple selections.
- Then select Add.

-
Type - Tree Select
- This allows your Agents to choose a disposition from the preset Option but also enables the ability for sub-options.
- Select + Add Option and label each of your options.
- You can set up as many as you’d like by selecting the +Add Option.
- Then select + Add Child under any of your options to add sub-options.
- Decide if you want to make this required or optional and if you want to allow for multiple selections.
- Then select Add.
-
Required
- Using the toggle, activate the “required” control to make it mandatory for agents to complete a deposition before moving on to the next call.
-
Allow Multiple Selections
- Using the toggle, activate the "allow multiple sections" control to allow agents to select multiple selections.
- Once everything is complete, select Add.
- Using the toggle, activate the "allow multiple sections" control to allow agents to select multiple selections.
- Preview your dispositions by selecting the three dots icon
 and then Preview Dispositions.
Completing Team Dispositions on the Webphone
Dispositions are labels that define the outcome of a call. Agents may be required to submit a disposition immediately after each call.
- If dispositions have been made a "required" field, users/ agents will see a disposition pop up on their webphones after completing the call.
-
Complete the text box, or select from a list of options.

Disposition Timers
If you would like your dispositions to only be available for a certain amount of time, for example 1 minute, before putting your Agent back into the queue you can set up a Disposition Timer.
With this timer you can set up how long the disposition will be available. Like all of the AVOXI disposition configuration this is available at both the Company and Team level separately. When set up the webphone status timer will count down from your configured time (e.g. 60 seconds) to 0, and once 0 is reached the disposition will be saved to that call and the Agent will be transitioned back into the Available status.
Setting the Disposition Timer to 0 will disable the timer.

Disposition FAQ's
What is the maximum size of disposition notes?
The maximum size is currently 32,000
What happens to my Agent's status when they complete a disposition?
After completing a disposition an Agent's status will change to Available. However, if they Agent was in a different status prior to taking/making the call, or changed their status during the call, we try to preserve that status when the disposition is completed. This allows an Agent to change their status before a call ends in case they need to take a break after the call.
What language do notes support?
English with basic character sets
How are notes saved?
These are saved using an autosave functionality
Can supervisors/managers add notes to internal calls?
No
Can you set dispositions at an org level for select agents?
No. When configured dispositions apply to all agents in the organization. In other words, the Support and Sales teams will share the same org-level dispositions. It is therefore important to create dispositions that are general and can be used for more than one team.
Can you compile a report on notes?
Yes, in the Analytics screen you can use the Dispositions report to view a report with all dispositions. You can also download disposition data for each call via Company Activity.
What happens if dispositions are set on a team and inbound/outbound dispositions are also configured?
Queue call dispositions will always supersede inbound or outbound call dispositions.
Can you edit a disposition/note after selecting submit?
No, once the disposition or note has been submitted this is final and can not be changed.
How long does it take for a note to appear within my CRM after submission by the agent?
As this is a text field the transfer should be no longer than 2 to 3 minutes.
Which Agent is prompted for the Disposition if there is a Transfer event?
The Agent who initially answered the call will be prompted for a Disposition in the event of a Blind or Warm transfer.